Having worked hard in the film slitting industry for over a decade, I've seen too many production lines overwhelmed by misalignment and edge curling. A perfectly good roll of film, when cut off, has uneven edges or lifts like ruffles, causing the entire roll to be downgraded from premium to inferior product, or even scrapped outright. Today, based on real-world experience, I will break down the root causes and debugging methods of these two major stubborn problems and explain them clearly.
1. First, identify where the "root of the problem" lies
Many people immediately adjust and correct misalignment when they see a misalignment, or replace the knife when they see a curled edge, which is actually a headache fix. In my experience, deviations and edge lifts are often not isolated issues; their roots are often intertwined.
The essence of deviation is a "path problem." During feeding, the film deviates from the preset centerline. The reasons may include uneven edges or uneven thickness of the material during unwinding, or it could be uneven roller alignment, equipment vibration, or even lateral displacement caused by tension fluctuations—the real 'hidden killer'.
The essence of edge curling is a "stress issue." After slitting, the film edges curl upward, with over 90% of cases related to improper tension control. Excessive longitudinal tension causes the film edges to shrink unevenly after excessive stretching; Unreasonable setting of the winding taper leads to excessive differences in force between the edges of the film roll and the interior, causing the edges to be pushed out.
On-site mnemonic: Find the path when going off-track, look for tension when tilting the edge. When both are concurrent, first check the tension closed loop.

2. On-site Commissioning "Four-Step Method"
Below is the standard process for solving such problems on site. Following this order can help you avoid many detours.
Step 1: First, "diagnose" the equipment—mechanical foundation inspection
Don't change the parameters right away. 80% of the misalignment problems actually stem from mechanical issues. I will start with three things:
1. Check the reel level: Use a dial indicator to check it; if the deviation exceeds 0.1mm/m, mechanical trimming is required. If the rewinding rack's base is loose or the bearings are worn, it can directly 'deceive' the correction system.
2. Check the parallelism of the guide rollers: Use a level or laser aligner to check whether each guide roller is parallel, with an error controlled within 0.02mm. If the guide rollers are not parallel, the film will naturally "crawl" to one side when feeding material.
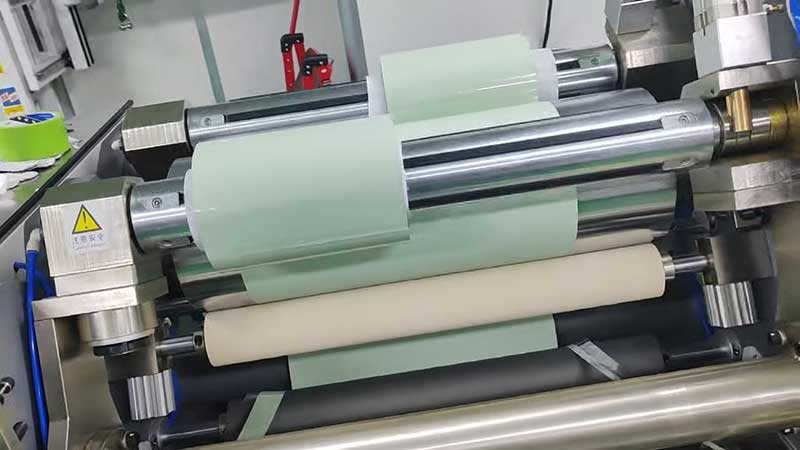
3. Check the blade condition: Blunt blades are the number one accomplice to curled edges. If the blade is too blunt, stretching occurs at the cut during slitting, causing the edges to naturally curve outward.
Step 2: Adjust the "eyes" and "hands and feet"—debug the correction system
Once the mechanical foundation is clear, adjust the correction system.
1. Sensor calibration: The sensor acts as the "eye" for correction. Taking PET film as an example, under normal film flow speed, the film edges are repeatedly moved to observe whether the controller feedback is linear. The sensitivity needs to be set just right—too high will amplify tiny jitters into false deviations, too low will leave you indifferent to actual deviation. The empirical value is to output a full-scale signal when the sensor offsets the edge of the film by ±3mm.
2. Actuator Response Matching: The actuator acts as the "hands and feet." Pushing too fast can overcorrect the film, making it swing like a pendulum; If you push too slowly, you can't keep up with the veer speed. Perform a step response test: artificially create a 5mm misalignment to see how long it takes for the system to pull back. For high-speed machines (above 300m/min), the response time should be controlled within 0.5 seconds, with overshoot not exceeding 1mm.
3. Set "dead zones": production lines cannot be absolutely stable. Set a ±0.5mm "dead zone" so that when the edges fluctuate within this range, the system does not operate, effectively filtering out noise interference.
Step 3: Conquer the "heart"—tension control and tuning
This is the core solution for curling edges and stubborn deviations. My tuning strategy is "small enough, uniform, and appropriately taper."
1. Establish baseline tension: Don't rely on feelings. According to the formula: Recommended tension (N) = film thickness (mm) × width (mm) × tensile coefficient per unit (PET is 8~12 N/mm²). For example, PET films 50μm thick and 500mm wide have a reference tension of about 250N.
2. Set the winding taper: This is key. As the winding diameter increases, the tension must decrease; otherwise, the outer layer will deform the inner layer by squeezing out. PET film is relatively hard, and the taper is recommended at 60%~80% (i.e., tension at full roll drops to 60%~80% of the initial value).
3. Adjust parameters by checking "symptoms":
| Edge lifting | Possible reasons | Parameter adjustment direction |
| The edges curl upward, and the side of the membrane roll is trumpet-shaped | The winding taper is too small (outer layer too tight) | Reduce the taper coefficient or lower the final tension |
| The edges are wavy and curved | The overall tension is too high | At the same time, reduce the initial tension for unwinding and rewinding (5%~10% steps each time) |
| The edge of the blade is raised, and the inside is smooth | Excessive local tension (blade not sharp or poor angle) | Check the blades and slightly reduce the speed ratio between the traction roller and the rewinding shaft |
| Edges curl appear at the start and stop moments | Insufficient acceleration compensation | Increase tension compensation during acceleration and deceleration (usually 10%~20% of the set value) |
4. Coordination and adjustment: tension and correction should not be "independent." Tension fluctuations directly interfere with the correction effect. I usually add feedforward compensation to the tension control program—when rapid increase in the coil diameter is detected, it automatically reduces the correction gain to avoid excessive system sensitivity.
Step 4: Detail "Adding Cuts"—Auxiliary Measures
If there are still flaws after the first three steps, these small tips often make the final push:
• Fine roller adjustment: The pressure of the roller must be "just enough to flatten the edges without leaving indentations." PET film recommends a line pressure of 1.5~3.0 kg/cm. The pressure roller should point toward the center of the winding shaft and be offset by no more than 5°.
• Static elimination:P ET films are prone to static electricity, and static adsorption can cause irregular edges to lift. Installing static elimination rods often works wonders.
• Ambient temperature and humidity: At high temperatures (>35°C), the film softens and the tension needs to be reduced by 20%.

3. Review of practical cases
Last year, I helped an optical film factory commission debug a 50μm PET film slitting machine at a speed of 200m/min, with a 15% scrap rate for edge curling.
Original parameters: unwinding tension 300N, winding starting 280N, taper 50%.
My operation:
1. According to the formula, calculate the reference tension of 250N, lower the winding by 260N, lower the winding start by 240N, and raise the taper to 70%—the improvement is obvious but there is still some warping.
2. Check the pressure roller: 4.5 kg/cm is too high; lower it to 2.8 kg/cm—the edges are noticeably smooth.
3. There is still a brief edge warping during acceleration and deceleration; increase acceleration compensation to 15%—the problem is completely solved.
The final scrap rate has dropped below 3%.
Finally, let me say a few heartfelt words
Misalignment and edge curling are not incurable "incurable diseases"; they are more like "chronic diseases" that require patient diagnosis. The biggest fear is blindly adjusting parameters without analyzing the cause. My advice is:
1. Establish a process database: record the optimal parameter combinations for different specifications and batches of films.
2. Persist in inspections: Before each shift, verify sensor accuracy, check actuator bolts weekly, and analyze correction action data monthly—a sudden increase in operation frequency often signals a precursor to mechanical failure.
3. Don't blindly believe in a "one-size-fits-all" approach: thick film and thin film, PET and BOPP, have completely different parameter logic. For example, thick films use slightly soft pressure rollers, while thin films require hard pressure rollers paired with extremely low pressure.
Remember this saying: tension is the soul of slitting, correction is the eye of slitting, and mechanical precision is the skeleton of slitting. Balancing all three naturally solves problems.
It is necessary to systematically investigate and resolve issues from four dimensions: process parameters, equipment status, excipient quality, and technological innovation.
10. July, 2026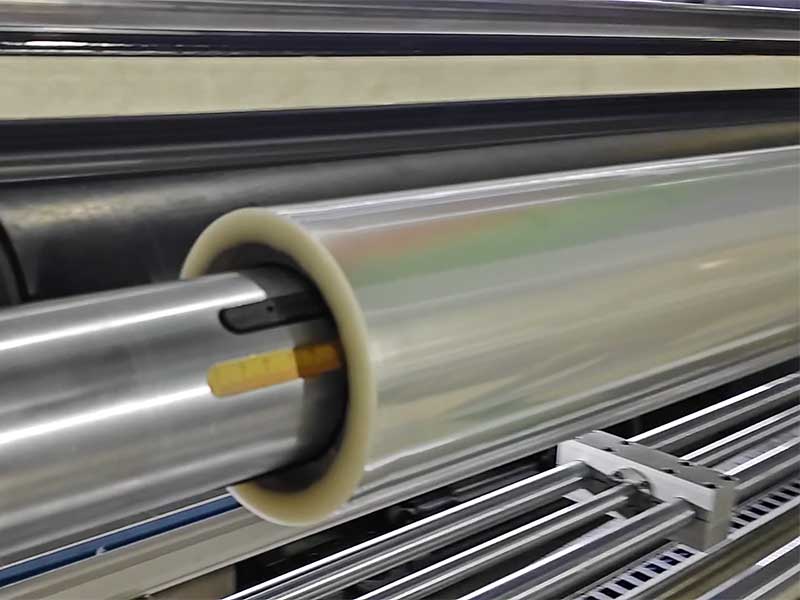
This article will provide an in-depth analysis of the two core pillars of high-precision solar film slitting machines: tension control and closed-loop correction.
06. July, 2026By 2026, the following five technological breakthroughs are redefining industry standards for slitting efficiency and value.
06. July, 2026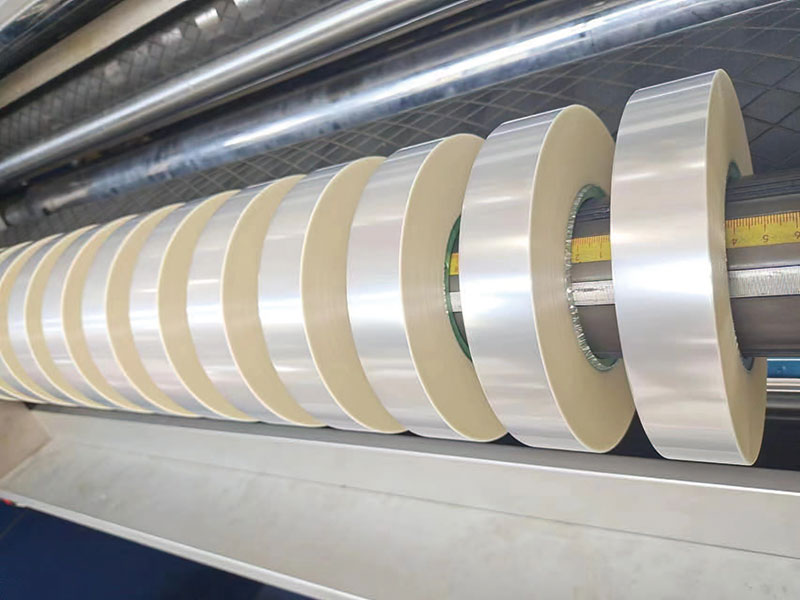
slitting machines are the core equipment for slicing wide, large rolls into narrow rolls of specific specifications.
02. July, 2026In other words, for every 100 rolls of finished film, 5 to 8 rolls of value silently disappear during the slitting process.
01. July, 2026


